Description
System Modules
It needs to be realized that for ACD’s to be fully functional under HTTPS protocol, its components should be switched to HTTPS protocol, namely the modules
- AuditProxy (Elasticsearch Kibana Proxy)
- AuditServer
- ExportServices
- AuditDriver
- AuditReport
- and in case of use of LDAPS (secure LDAP)
SSL Certificates
It is important! In order to prevent any potential problems we highly recommend the use of “TRUSTED SSL CERTIFICATES”, namely the certificate issued and signed by a TRUSTED STORE.
If you are going to use a SELF-SIGNED certificate, you will need to fulfill an additional number of steps as well as adding your SELF-SIGNED certificate to the web-browser exceptions and to the list of trusted certificates of your JVM cacert.
In order to make the conversion and export of certificates and Keystore more easy and clear, we also recommend using the free software KeyStore Explorer.
It can be found in ACD installation packages or the newest version for your operating system can be downloaded from the following website https://keystore-explorer.org/
This guidance implies that you have already got JKS or PKCS Keystore containing a private key and a certificate chain that corresponds to the hostname of the server that ACD and components are located on (basic installation).
Installation
Export of private key and certificate chain into PEM format (required for AuditProxy)
- Start KeyStore Explorer and open your PKCS12 or JKS file.
If you are asked to enter your keystore and private key password, please do so. - Choose the required certificate from the certificates list and click the right mouse button.
Choose Export -> Export Private Key from the drop-down menu.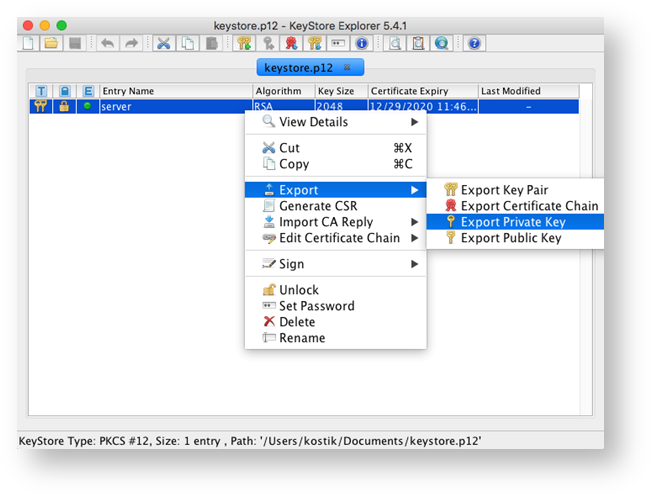
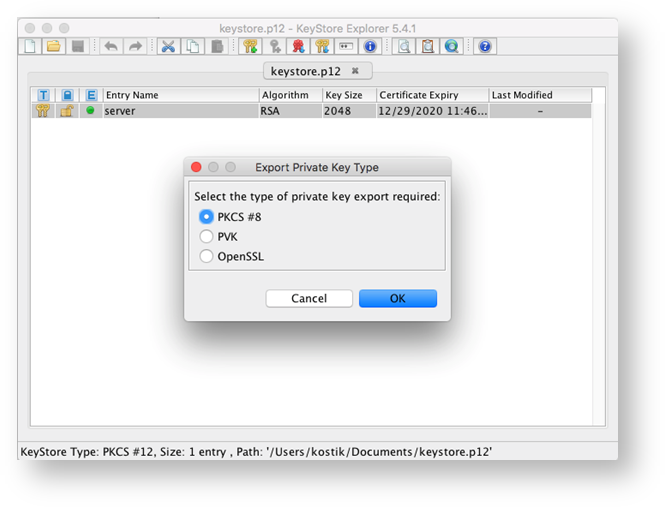
- Select the type of Export PKCS #8 and press OK.
- In the new window uncheck Encrypt, choose PEM and enter the path to a location where AuditProxy is installed.
Also, enter the file name for your private key as well.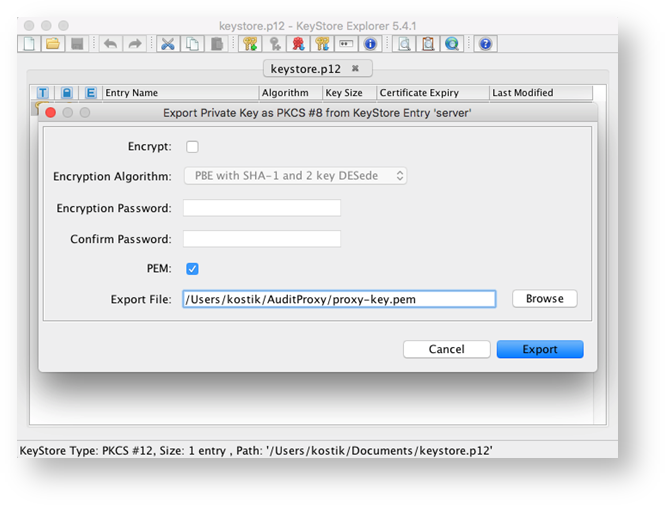
- Click Export to export the private key.
- Next, choose again the required certificate from the certificates list and click the right mouse button. Choose Export -> Export Certificate Chain from the drop-down menu.

7. In the appeared window choose Entire Chain, Export Format X.509, tick PEM box and enter the path to the location where AuditProxy is installed.
Also, enter the file name for your certificate chain.

8. If you use Self-signed certificates, you also have to export Public key. Choose the required certificate from the certificates list and click the right mouse button.
Choose Export -> Export Public Key from the drop-down menu.

9. In the appeared window tick PEM box and enter the path to the location where AuditProxy is installed.
Also, enter the file name for your public key. Click Export.

The export procedure is completed.
SSL certificate installation for AuditProxy (Elasticsearch Kibana Proxy)
- Stop AuditProxy.
- Open the folder with AuditProxy and create a backup copy of config.json file (in case of the return to http protocol).
- Open config.json file in a text editor and take the following steps:
a) Set useSSL in true for helpers, elasticsearch, kibana section.
b) Enter the file names for keyFile and certFile, which you used for export (please see above).
c) In kibana section, in auditUrl field change the protocol from http to https.
d) Enter the name of the public key file, which you used for export (please see above).

4. If you use Self-signed certificates, you also have to enter the parameter check-cert=false to launch kibana-http-proxy application.
5. Save changes for config.json file and launch AuditProxy.
6. To check if AuditProxy services started properly, open the following URLs in a browser:
a) https://127.0.0.1:5151/ - to check elasticsearch proxy.
b) https://127.0.0.1:5050/ - to check kibana proxy.
c) https://127.0.0.1:9090/ - to check AuditServer config service.
The page with the login/password request or the message “Protected area” should appear.
* (where 127.0.0.1 is the name or IP address of the server, where AuditProxy is installed. Please replace it with the correct one, which you use in your system)
** if you changed ports for the services, please use the ports, which you entered in config.json
*** If you use self-signed certificates, there can appear a warning that the certificate, used on the server, is not trusted.
In this case, you should add exceptions to each of the URLs or import this certificate as trusted to your web-browser (see Web-browser documentation).

**** To investigate potential problems with SSL certificate and the service operation use a log file, which you can find in the folder with this service.
SSL certificate installation for AuditDriver
- Copy your PKCS12 or JKS keystore to the IDM server, where AuditDriver is installed.
- Open settings of AuditDriver in iManager or Designer and make the following changes:
a) In Elastichsearch server field change the protocol from http to https.
b) In Elasticsearch SSL Keystore Type field (for HTTPS connection) enter the keystore type, which you use, PKCS12 or JKS.
c) In Elasticsearch SSL Certificate filepath field (for HTTPS connection) enter the path and the name of your keystore file.
d) In Elasticsearch passphrase field (for HTTPS connection) enter the passphrase, which you use for your keystore.

3. Save the setting changes and restart AuditDriver.
* To investigate potential problems with SSL certificate and the driver operation set debug trace level and debug log file in the driver settings and restart it.
SSL certificate installation for AuditReport
- If you use self-signed certificate for your SECURE LDAP connection, you have to export your Public certificate from the IDM server and add it to PKCS12 keystore.
(It is easy to do by using KeyStore explorer).
a) Copy the created keystore into the folder with AuditReport.
b) Open reportservice.yaml file for editing.
c) Change the protocol from ldap to ldaps in ldapserver field and enter the port, used for secure ldap.
d) Enter your keystore file name in ldapsrvkeystore field.
e) Enter the password, which you use for your keystore in ldapsrvkeysorepwd field.

* You can also launch AuditReport manually and check the log file for mistakes to make sure that everything is set up correctly.
SSL certificate installation for Audit Server
- Open the folder, where AuditServer is installed and make a backup copy of auditserver.mv.db file in case you want to return to the previous settings.
- Copy your keystore file that contains private key and certificate chain to the folder with AuditServer.
- Open AuditServer Administration page in a web-browser, Adiministration -> Settings, and go to the tab GLOBAL.
- Fill in necessary fields for HTTPS setting:
a) Click on the checkbox next to Enable/Disable HTTPS field.
b) Enter your keystore type, PKCS12 or JKS, in Server KeyStore Type field.
c) Enter your keystore file name in Server KeyStore file field.
d) Enter passphrase for your kesytore in Server KeyStore password field.
e) Enter passphrase for your private keys in Server PrivateKey password field.

f) Go to the tab Elasticsearch & Kibana.
g) Make sure that Enable/Disable HTTPS checkbox is active.
h) Since all the services are installed on the same server, enter the same values for Keystore type, Keystore file, Keystore password as for the GLOBAL tab.

5. Click Save button.
6. Restart AuditServer.
7. Change the protocol from http to https in the address bar of your browser in order to open AuditServer page through https protocol.
*** If you use self-signed certificates, there can appear a warning that the certificate, used on the server, is not trusted. In this case, you should add exceptions to each of the URL or import this certificate as trusted to your web-browser (see Web-browser documentation).

* To investigate potential problems with SSL certificate and the service operation use a log file, which you can find in the folder with this service.
** If while launching Audit Server has problems with certificates opening, it can automatically switch to http protocol and let you change the settings.
*** Attention! If at least one of the ACD modules (AuditServer, AuditProxy, ExportService) runs with http protocol, it does not guarantee the proper operation of ACD in general.
**** Also, to solve problems with self-signed certificates you may need to add your self-signed certificate to cacert truststore of your Java.
Please follow the steps as described below:
a) Launch KeyStore explorer and open cacerts file from /lib/security folder of your Java, used for ACD launch. If you did not change the password, it remains “changeit”.
b) From Tools menu choose Import Trusted Certificate and choose your certificate chain (see above how to export it).

c) Set alias for the imported certificate.

d) Save your changes File -> Save.
e) Restart ACD modules.
Possible problems and ways to find and solve them
Dashboards are not shown in AuditServer
- check if kibana proxy is active in your web-browser (see above)
- check if AuditServer and AuditPoxy are using the same protocol – https
- check if there is https defined in AuditProxy config.json file, kibana section, auditUrl attribute
- check log files in AuditServer and AuditProxy for mistakes
- if you use self-signed certificates, make sure that exceptions for the certificates used for AuditProxy were added to your web-browser (see above)
Reports and indexes Elasticsearch are not shown in AuditServer
- check if elasticsearch proxy is active in your web-browser (see above)
- check if AuditServer and AuditPoxy are using the same protocol – https
- check log files in AuditServer and AuditProxy for mistakes
- if you use self-signed certificates, make sure that exceptions for the certificates used for AuditProxy were added to your web-browser (see above)
AuditDriver cannot sent data to elasticsearch (via AuditProxy)
- turn on logging for the driver and analyze log files
- check that keystore used for AuditDriver works properly and contains the required certificate to access AuditProxy
* If problems appear, please provide us with full screenshots of ACD modules settings, as well as log files of the services, which have problems.
** For rollback https changes:
- Stop ACD components
- copy your backup config files to original place
- start ACD components